WP Real Estate Kit
WordPress Real Estate Directory Kit
- by: wpdirectorykit
- email: support@wpdirectorykit.com
Quick Start
Minimal Requirements:
- PHP version 7.2 or newer
- MySQL (4.1+)
- WordPress 5.2+
Quick installation with wordpress already installed:
VIdeo Instructions: https://www.youtube.com/watch?v=ILVXyiIt1PI
Real Estate Directory Moison Theme Installation and styling Video: https://wpdirectorykit.com/uploads/real-estate-directory-moison-install.mp4
Installation Real Estate Golden theme on localhost usink localwp app: https://wpdirectorykit.com/uploads/localwp-install.mp4
Clean Installation with NexProperty theme + all plugins:
1. You should have WordPress >5.2 installed ( https://wordpress.org/ ), best if you have clean installation.
2. Upload nexproperty_theme.zip in Dashboard->Appearance->Add New->Upload Theme->Select Theme and Activate or if you can't because of some filesize limitation then via cpanel file manager to folder "wp-content/themes" and extract directly on server or just extract in localhost server
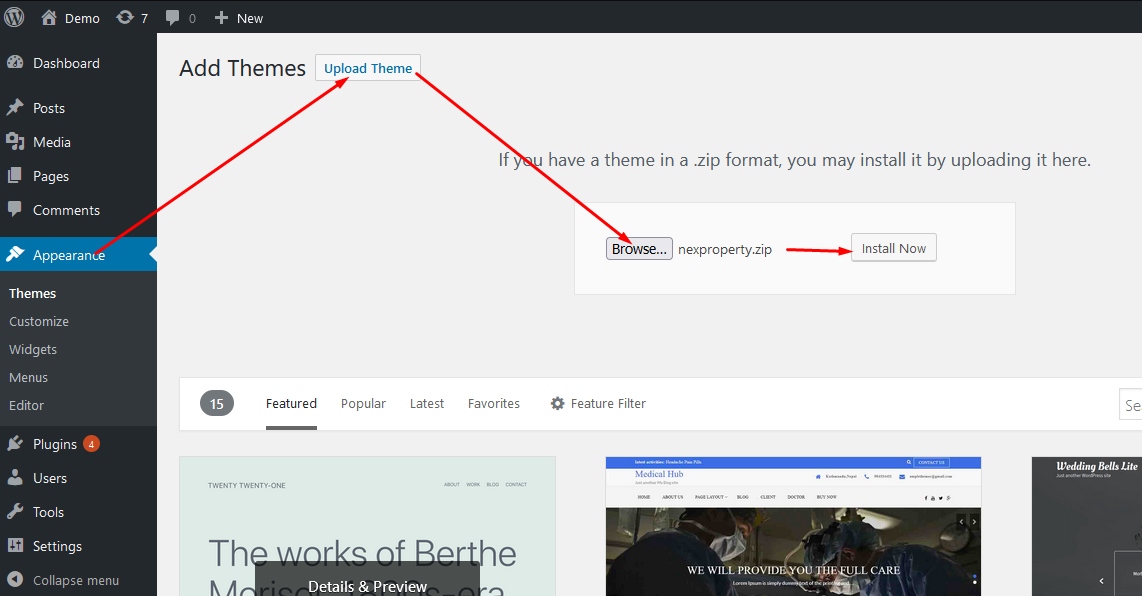

If you uploaded/extract files manually then Open your Wordpress Administration, click on Appearance and Activate nexproperty theme if you still didn't
4. After theme is activated, will suggest to Install Required Plugins on top, Installall of them by clicking on Install Required Plugins, Select All, Bulk Action Install and Apply


5. Activate this same plugins on top, activate all of them by clicking on Begin activating plugins, Select All, Bulk Action Activate and Apply

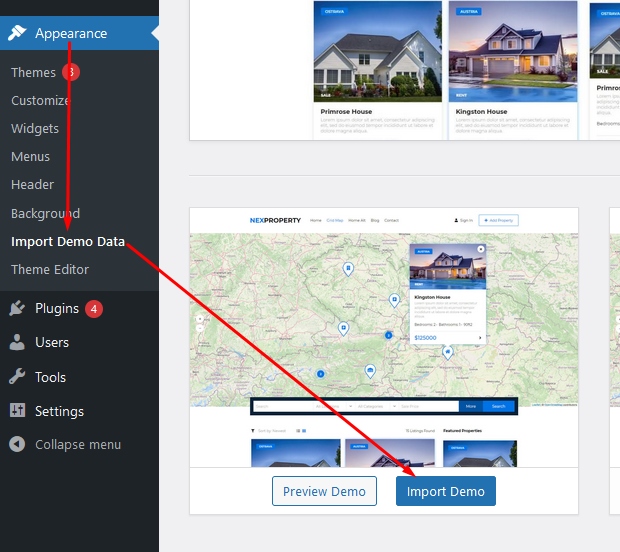
6. Import Demo Data

Great, you completed your installation, read forward for more details, check videos or on trouble contact with support team via email.
Clean Installation with Pro plugins but without NexProperty theme, so when you using some third parity theme (SKIP if you completed above!)
1. You should have WordPress >5.2 installed ( https://wordpress.org/ ), best if you have clean installation.
2. All plugins are located inside plugins folder, install them one by one or extract them into your plugins folder inside wordpress installation wp-content/plugins


3. Activate all plugins/addons

4. Install and activate recommended plugins


5. Import demo data for Directory

6. Import Demo Data for Membership addon

Great, you completed your installation, read forward for more details, check videos or on trouble contact with support team via email.
= Beta/Testing packages Installations= Link
If you received beta version, have in mind this may cause some unpredictable issues but usualy just solve your trouble or give yo uoportunity to test some new non official feature.
1. So first make Backup with wp all in one migration plugin or zip files and download db from cpanel.
2. You need to know what you have, usualy we providing plugin as beta because plugin contain functionality.
In Admin->Plugins deactivate and delete related plugin, usualy "WP Directory Kit"
Then Admin->Plugins->Add New->Upload Plugin and upload your received plugin
Other rear case: if you have theme then you need to install in Admin->Appearance->Add Themes->Upload Theme
On troubles you can also provide cpanel login and wp-admin login to our support team and we will be happy to assist you.
Pages needed
Our demo data importer or you can build this specific pages which are used to show some specific data, like data for listing preview. For start will be much easier if you use demo data importer, and then try to replicate/customize it.
This way system know which page need to open to show listing preview page data, results, agent page or similar...
Main directory pages like results and listing preview page are defiend in Dashboard->Directory Kit->Settings

Membership pages are defined in Dashboard->Users->WDK Membership->Settings

Categories
Some Categories cooming with demo data importer or you can build it also manually.
Categories can be structured in trees, that means some categories can have sub categories and also sub-sub categories

Subcategories, also can be added by clicking on "Add Category" Button, just then you need to select parent category here:

On listing submission you can select related

You can add new category and define basic info needed, hints and descriptions provided on form
If you want to define sub-category then you need to define parent category related to this sub-category actually child-category in such meaning

Multiple categories/locations also supported, just need to be enabled in setitngs:

Hide specific fields based on category selection?
Admin Dashboard -> DIrectory Kit -> Categories -> Edit wanted
And here you can select visible fields, his will take effect on add listings and search forms

Locations
Some Locations cooming with demo data importer or you can build it also manually.

In general everything is similar like categories
Multiple categories/locations also supported, just need to be enabled in setitngs:
Custom Fields
Usualy first fields are generated by demo data importer:

This fields and section can be restructured, replaced/moved with drag & drop, resized etc.
Like this client need to populate this fields on listings submission, you can notice that fields are positioned same and sized same (columns num):

Then for example when you building layot for listing preview page in elementor, bulding search form or result card you need to position this fields on layout design visually
Video examples:
https://www.youtube.com/watch?v=cewZBOGzbPg
Custom Map Marker Field
You can also use field value like price instead of marker on map, example:

Result Card Designer
On left side you can see similar structure as on fields, this fields you just move to right side to wanted position on result card

Example mapping with standard result card layout design

There are some options like css class, usable for custom stylings and columns for width, 2 for example mean to take 2 columns from standard total 12 columns in grid responsive design.

Results element support custom results order, you can configure this way:

Results element support custom queries for any field, example for disable featured results, you can configure this way:

Search Form Designer
On left side you can see similar structure as on fields, this fields you just move to right side to wanted position on search form

THere are some custom predefined fields, used for some special purpose or for standard fields, not custom fields

for example element "more" is like pagebreak and after this element all will be visible when user click on more, on search form:

There are some options like css class, usable for custom stylings and columns for width, 2 for example mean to take 2 columns from standard total 12 columns in grid responsive design.
On NUMERIC and DROPDOWN/INPUTBOX fields you will found also option Min/Max, this is used when you want search from or to entered value in search form.

if you searching by number, like number of rooms, always use NUMERIC field, and if you eventually need DROPDOWN then enter values inside field and will be shown like dropdown on search form
if you searching by text, like energy efficiency A.B,C then use DROPDOWN or INPUTBOX

How search form works?
Search form works based on AND logic, so searching for listings which contain all criterias defined in form.
For example if you ahve 2 checkbox fields like Cooling, Heating, and you select both i nsearch form, this means that you searching for listings which have both options cooling AND heating.
If you wan tto enable multiple locations or multiple categories search thats possible with single field like example:

this option can be enabled in settings here:

You can also use DROPDOWN MULTIPLE field for similar purpose, if not related to location or category
To enable price sliders:

Layout Builder
On frontend you need to be of course logged in with admin, then on wanted page you can click "Edit with Elementor"

There are many fields which you can use to build your pages, of course you can combine also elements from other Elementor plugins. Maybe most simple if you import demo data, and then investigate how pages are build and add your own changes or completely new pages.

There are some special options in elements like Query where you can fetch/show only specific listings based on wanted specific parameters

in this case field_5, field 5 is actually purpose id #5 is visible in dashboard on fields management page, location_id and category_id also can be used same as any other custom field
field_5=sale means actually that value must contains sale
if you want exact same value then use:
field_5_exactly=sale
for checkboxes you can use example:
field_92=1
Video examples:
https://www.youtube.com/watch?v=NhAHlMg-hpQ
Example how to change number of columns in Wdk Listings Carousel

Example how to change Elementor elements order on specific device or hide elements on specific device
In elementor you can archive this, some elements can be hidden on specific devices:

Elementor PRO
In general our solution can be used with Free Elementor Version, we testing and using Free version in our demos and everything what you need is Free version.
If you decide to buy Elementor PRO, please support us and purchase from this link:
Change Colors
Colors you can change in Elementor, example to change serch button color:

In general always check all tabs in elementor options, you will found many options
If not found some very specific styling you can add with custom css
Custom CSS can be usualy added via customizer, guide: https://www.wpbeginner.com/plugins/how-to-easily-add-custom-css-to-your-wordpress-site/
Or also in some elements we put custom css like:

Examples on pagination:

Example for search form, select field inputs:

Change color on result card background example:

Change color don't take effect, not changing or is transparent?
Is not wlways just color, but also transparency!

Problem is usualy in this second slider bar, when it is fully on left, means full invisible color, so must be full on right side
For example if you have 8 chars color code like this: #02010100
last 2 chars, in this case 00, means fully transparent
If you remove this last 2 chars then you get standard color code without transparency defined
Booking
Booking is Addon Plugin so you need to enable them, if you don't have it then you need to buy it.
We prepared video, so you can check it here: https://youtu.be/UURNh6rTmsc
This plugin also require membership addon to work properly so best that you installit and import demo content as described in Membership Addon Docs: https://wpdirectorykit.com/plugins/wp-directory-membership.html
Booking Addon purchase here: https://wpdirectorykit.com/plugins/wp-directory-booking-calendar.html and install it in wordpress as usual
1. To show calendar on listing preview page you need to edit your listing page (element available only on listing page!) with elementor and add calendar element on wanted position.
Also Rates/Availability/Pricing table can be added same way

2. Contact form is needed for reservation functionality on listing preview page

3. To enable Booking features, for specific listings you need to add Calendar and availability dates/prices
Admin can add via dashboard or owner/agent via frontend dashboard also

4. You should also add some availability dates and rates

If you noticed no results:

Most probably:
for specific listings you need to add Calendar and availability dates/prices from dash
or your available dates are already reserved as described above
Manual payments is possible by just entering wire transfer data instructions iwhen adding calendar
Online payment is supported via woocommerce, support almost any payment gateway, can be enabled in settings:

Some settings yo ucan found in Admin dashboard -> WDK Bookings -> Settings
Some Calendar related in Admin dashboard -> WDK Bookings -> Calendars -> Edit wanted
And some Frontend elements related in Elementor specific elementor options
Booking Proccess Flowchart

Listing Preview Layout Builder
Similar thing as for previous page building:

But here is now special category for listing preview elements WDK LISTING PREVIEW, which are specificaly related to this specificaly page:

WDK Field Value is one of most standard elements:

This field is a bit special, it also autodetect if you enter youtube or link and for example show video or show link
Link is very usable if you need for external website link, phone number, whatsapp number or similar
This way you define whatsapp number:
[wdk-listing-field-value field_id='19']
How to add section:


Video examples:
Shortcodes
Listing preview
[wdk-listing-field-label field_id='19'] - Label of field
[wdk-listing-field-value field_id='19'] - Field value + suffix/prefix (possible define attr post_id, like post id)
[wdk-listing-field-value-suffix field_id='19'] - Field suffix
[wdk-listing-field-value-prefix field_id='19'] - Field prefix
[wdk-listing-field-value-text field_id='19'] - Field value (possible define attr post_id, like post id)
field_id for special main fields, key are:
Title = post_title
Description = post_content
Address = address
Category = category_id
Location = location_id
Latest listings
[wdk-latest-listings-list] - show latest listings in list view
custom_class (string) - custom css class
order (string) - order by for results
conf_query (string) - custom string query like field=xx&field_2=xxx
limit (int) - limit listings, default 2
only_is_featured (string), yes, if yes show only featured
conf_custom_results (string) - like 1,2,3,4,5 where id is id of listing

Favorite heart
[wdk-favorite-action], show action add/remove favorite
page id or profile, auto detected
Example (on page this is element, but shortcode same looks):

Review
[wdk-review-avg] - show avg rating of profile/listing (just stars 1 -5 )
Example (this is shortcode)

Translations
1. You need to translate static texts / po fiels
Install and activate Loco Translate plugin
POedit or similar tools are not suggested because are more complicated to use and sometimes simply doesn't work out of the box.

Video examples:
https://www.youtube.com/watch?v=ip1dJm6xc-0
If you will have only one language on website, so no multilanguage, just translation, then you simply go over complete page content and change it/translate to wanted language one by one, example this is most important parts to translate:

so all posts, pages, directory kit fields, then listings, and menu
If you need multilanguage / multilingual
1. Make part 1 for your default language, usualy default is english so can be skipped if so
2.A (More simple) AUTOMATIC TRANSLATION for multilanguage - one option is that you have only one language on site like "English" and all other are automatically translated by Google. For automatic translation you can use plugin
Gtranslate https://wordpress.org/plugins/gtranslate/ (Manual translations only in premium version)
TranslatePress https://wordpress.org/plugins/translatepress-multilingual/ (Allow also manual translations)
2.B MANUAL TRANSLATION, this way clients/you will need to translate all listings to multiple languages, so enter manualy values for every single language
This is very hard to manage later if you have many listings so think twice about this, thats why booking.com and similar popular portals don't allow that, but use only english instead.
Of course, sometimes this is simply requried and you need manage manualy multiple langs on page.
We working on this feature currently and cooming soon
Import/Export
This is helpfully if you need move lsitings fro msome other solution to our (Import), or from our to some other solution (Export)
You need WDK import/export plugin and wp all import plugins:
https://wpdirectorykit.com/plugins/wp-directory-import-export.html
https://wordpress.org/plugins/wp-all-import/
Export
Export is available in XML, Tools->Export WDK Listings:

Import
Install and activate "wp all import" plugin, free version is enough.
Video instructions: https://www.youtube.com/watch?v=b1yS0uuA9xA

All Import->New Import->Upload a file->Selected wanted file from filesystem for import->New Items->WDK-Listings->Continue to Step 2

In step 2 select node element of listing, usualy auto selected and Continue to Step 3

In step 3 drag and drop / mapping wanted elements from your file structure to wanted fields in system, example:
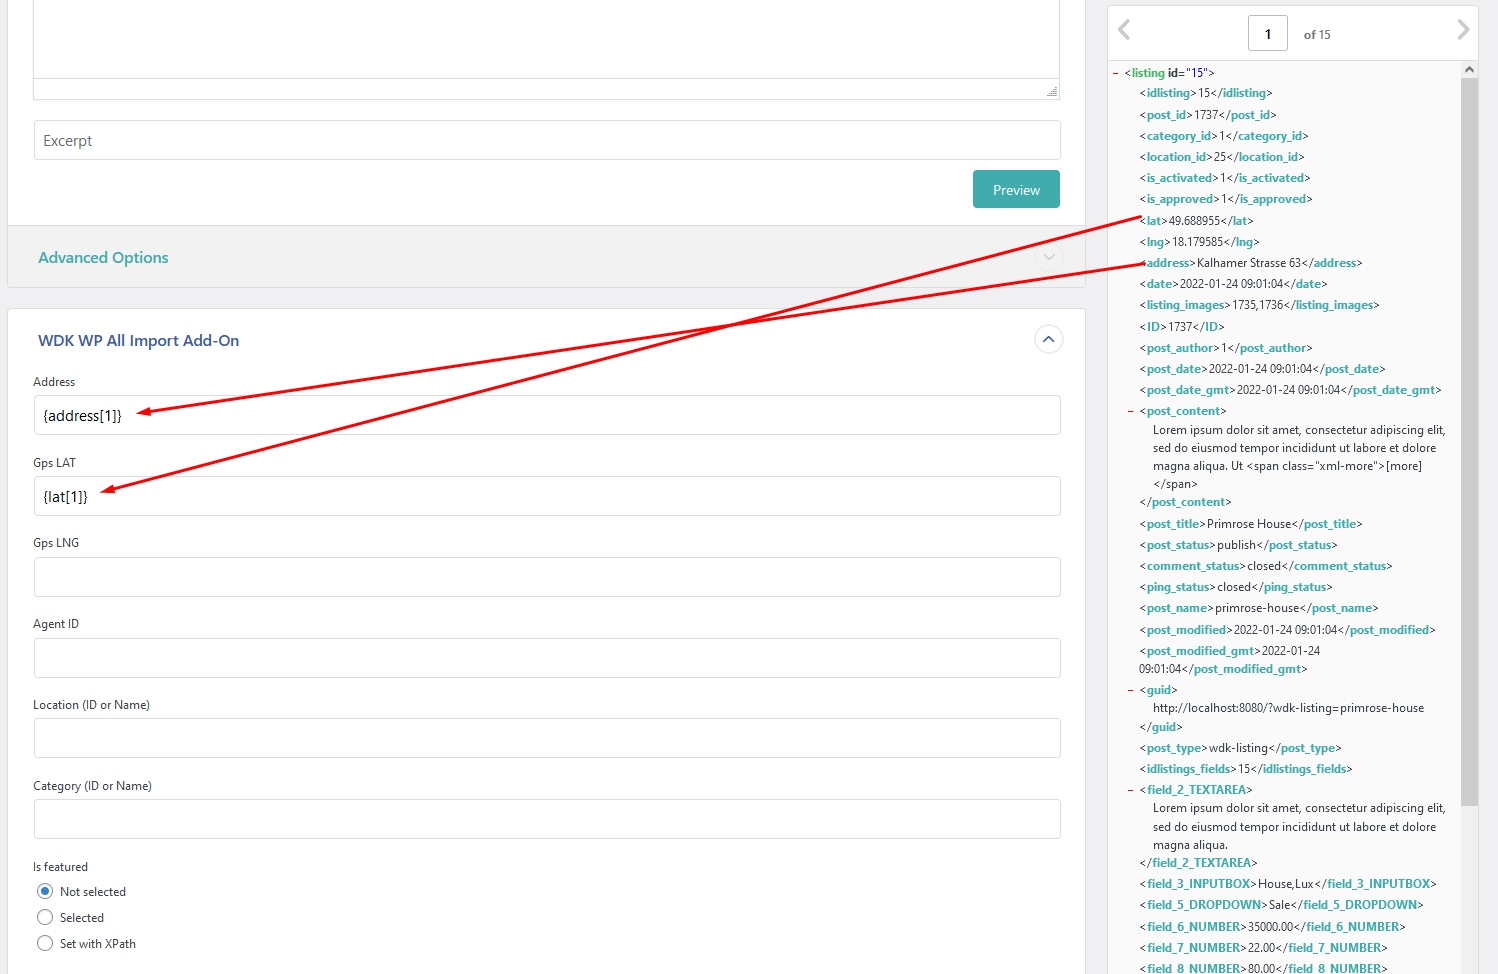
In step 4 define id, also with drag and drop

After that continue and run import

Hint:
Because of many servers limitations, we define max 5 images upload for listing. If needed possible to change this number in wp-contentpluginswdk-wp-all-importwdk-wp-all-import.php, search for
should be around line 40, and change to wanted number, if you have control on max execution time config on server.
User custom fields
Membership plugin is required for this feature:
https://wpdirectorykit.com/plugins/wp-directory-membership.html
In elementor you can add some predefined custom fields to registration form to become auto populated:

Can be also populated here from frontend dashboard

On edit listing preview page and form in elementor, yo ucan add custom fields:

If you use woocommerce, also woocommerce support some fields population important for payments
Membership Dashboard
Membership addon you can purchase on our website:
https://wpdirectorykit.com/plugins/wp-directory-membership.html
Installation video with 2 scenarious (just plugin or complete theme):
https://wpdirectorykit.com/codecanyon/docs/img/membership-install.mp4
Agents Quick User Guide:
https://wpdirectorykit.com/codecanyon/docs/img/agents-guide-08-2022.mp4
How to add content on membership dashboard?
Sometimes you want to show some elements only on specific dashboard page
One simple solution via elementor is to use plugin Dynamic Visibility for Elementor
https://wordpress.org/plugins/dynamic-visibility-for-elementor/
After activating this plugin you will found tab visibility on every element, and based on GET variable you can show specific content, example for favorites:

So put this here:

Example video: https://wpdirectorykit.com/codecanyon/docs/img/managa-dashboard-pages.mp4
Other way is manualy via file editing HTML etc, for this check section custom coding. This is more suitable for theme builders, but you can also redesign complete layout very in detail, on HTML level
Membership Subscriptions

Membership subscriptions are part of membership features
Here will describe difference between membership, subscription and recurring payments:
Membership means being a member of a website and organization or a group
Subscription gives customers access to a product or a service for a period of time (this can be free, paid manually for a period of time or can be charged with recurring payment)
Recurring payment means that user will be charged automatically for a period of time
Payments can be hadled with:
- WooCommerce (free) for regular one time payment processing for a period of time
- For automatic recurring payments you will need also (paid) "WooCommerce Subscriptions" Extension by WooCommerce or Alternative like "Subscriptio"
What happening when membership subscription expires?
When user extend subscription or pay, it's automatically extended.
Your cronjob may be disabled also in wp-config.php file, in such case remove or comment this line:

= Troubles with Orders page? = Link
Problem is most probably related to WooCommerce dash page, for orders we using WooCommerce dash, but in your case you defined same dash page for WooCommerce Dash and our Frontedn Dash, but must be different and this causing conflict:


Solution: Add new page and set is here as WooCommerce->Settings->Advanced, "My Account Page"
Check also our FAQ section here in documentation in case of other similar troubles
You want to rename roles?


https://wpmudev.com/blog/change-wordpress-role-names
SEO
For SEO we suggesting to use Yoast plugin for regular pages.
On listing pages we added compatibility in fields way, so you need to populate this fields, title, keywords and short description, example:

Email Config & Templates
Email Config
Very usualy sending email on servers doesn't work by default with mail function, thats why you need to use SMTP config, we suggesting this plugin: https://wordpress.org/plugins/wp-mail-smtp/
Also if you wish to change Sender "WordPress" use above plugin
Templates
email texts most simple to change with loco translate plugin (check translation section, is same thing, you can replace words with translation also)
email templates are here for now:
wp-content/plugins/wpdirectorykit/application/views/email
Custom Coding
For custom css/style changes check this: https://www.wpbeginner.com/plugins/how-to-easily-add-custom-css-to-your-wordpress-site/
Main functionality is implemented in plugin wp directory kit.
Code is structured in standard wordpress boilerplate starter plugin: https://wppb.me/
Arhitecture is based on MVC, base library: https://github.com/sandiwinter/winter_mvc
- Model contains data logic
- View mostly HTML and display logic
- Controller contains functionality
In plugin code thats located here:
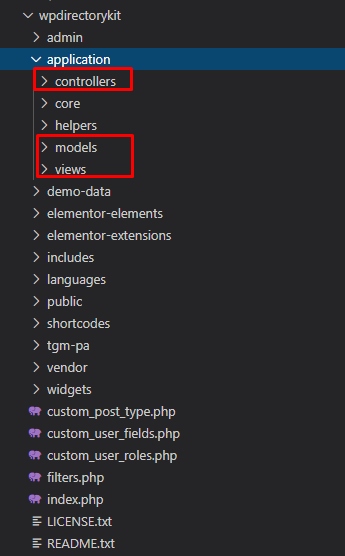
similar structure you will found also in our other plugins/addons
helpers contains basic small "helper" functions
folders like elementor-elements, elementor-extensions, shortcodes, widgets, languages are all well known for all elementor/wordpress developers
vendor, there we put winter_mvc library
demo-data contains data and iamges for import demo data
tgm-pa is popular library which suggesting to install recommended plugins etc, more info on http://tgmpluginactivation.com/
Build custom HTML / View files for specific elements
All elements have own view files in MVC arhitecture and loading specific view files like example:

We implement feature to customize view files in way, that you can add your custom layout into your own theme.
For this example we will create one new layout for this listings results, so we will copy existing file into theme:

so copy it to path:
wp-content/themes/nexproperty/wpdirectorykit/elementor-elements/views/wdk-listings-results.php
Just for example we will add basic HTML code:

And this code is now visible on website:

Example for result item card:

File related: wp-content/themes/nexproperty/wpdirectorykit/application/views/frontend/result_item_card.php
or similar based on different theme name, here in example is nexproperty
code example for such contact button:
Screen from file:

So now you can make your completely own design for any element
Mobile App
We build custom API for Wordpress contained in wdk-api plugin, cooming with mobile app package.
WordPress already support REST API, we added our custom api calls for app needs.
Details about standard wordpress rest api: https://developer.wordpress.org/rest-api/using-the-rest-api/
sometimes api url /wp-json/ may not work, usualy this is because of permalink config, so try change permalink to "Post name"
Also check if your rest api is not disabled in wp-config or by some plugin
Request output you can see in Browser or using Postman app
API details:
example request url in our case when website domain is https://app.wpdirectorykit.com/:
https://app.wpdirectorykit.com/wp-json/wp/v2/wdk-listing
/wp-json/wp/v2/wdk-listing
This is GET request
Custom fields we added also in default wp rest api call for our custom post type wdk-listing
/wp-json/wdk/v1/fields
This is GET request
Fetch all listing fields from system
/wp-json/wdk/v1/agents
This is GET request
Fetch all listing agents from system with options:
per_page - how many items or per page
paged - current page
/wp-json/wdk/v1/locations
This is GET request
Fetch all locations from system with options:
level - Level Deep Number, usualy 0 for first level only
/wp-json/wdk/v1/categories
This is GET request
Fetch all categories from system
/wp-json/wdk/v1/listings?search_category=2
This is GET request
Fetch all listings from system with filtering options:
Above example will filter by category ID 2
per_page - how many items or per page
paged - current page
field_search - smart search based on multiple fields
is_featured - can be on or off
search_category - category ID
search_location - location ID
search_6_min - 6 is field ID example, can be any, in our case is "price" minimal, so will show all with higher price then defined
search_6_max - 6 is field ID example, can be any, in our case is "price" maximal, so will show all with lower price then defined
field_29 - 29 is field ID example, can be any, in our case is "washer" checkbox, can be 1 or empty
/wp-json/wdk/v1/news
This is GET request
Fetch all news from system
App is based on Flutter technology by Google, same codebase can be used for iOS and Android App.
Nice Material Design Elements and Effects are used. Colors, Logos, Texts can be easily adopted for your portal.
/wp-json/wdk/v1/listing_agent_message
This is POST request
Parameters should be send in json message body how usualy flutter like, so similar to firebase.
listing_id
Name
Message
FAQ
= Does it works with all themes? =
Yes all themes supported
= Does it require other plugins to work properly? =
You can use it without any additional plugin but for complete functionality like custom fields and elementor support you need to install recommended plugins
= I have troubles with favorites saving or some old data on website even after refresh? =
Please try to disable all caching plugin and tools in your wordpress, server or pc
= How to change currency? = Link
Currency is just prefix/suffix on related price field in wpdirectorykit plugin.
Dashboard->Directory Kit->Fields->Edit sale price or rent price and change suffix/prefix

= How to configure prce formating? = Link
WordPress support price formating based on language selected in WordPress Settings
To enable this for listings also, you need go to:
Admin->Directory Kit->FIelds->Edit wanted price fields and set this checkbox price format:

= How to change language? =
Translation: http://wpdirectorykit.com/documentation/#!/translations
Video: https://www.youtube.com/watch?v=ip1dJm6xc-0
So use loco translate and translate/rename fields in admin dashboard
= How to add new country in locations? = Link
Admin->Directory Kit->Locations->Add location
Select Parent: Root
In Title enter new country name
Click on Save

= Error: Internal Server Error (500) = Link
Regarding hosting providers, we using in our demos cpanel shared hosting (NOT WordPress managed) version from:
![]()

xmlrpc,xmlwriter,xsl,zip,intl,json,mbstring,mcrypt,mysql,mysqli,opcache,pdo,pdo_mysql,phar,posix,soap,sockets
You can check php.ini configuration, try use this values:
upload_max_filesize = 128M
post_max_size = 128M
max_execution_time = 5000
max_input_time = 2000
memory_limit = 512M
max_input_nesting_level = 128
max_input_vars = 10000
output_buffering = 4096
Regarding hosting providers, we using in our demos cpanel version from:
![]()
Sometimes php.ini can be changed directly in cpanel, try check for multi php ini editor or similar php config in cpanel
Timeout example, but can be any message or even no message in browser console:

Example solution:

But sometimes even this don't help because server providers have limitations, then you can ask them to increase it or do something to reduce time, for example if you do import listings then reduce number of images for import per one listing and similar.
We suggest using third parity free plugins like https://wordpress.org/plugins/nextend-facebook-connect/
So install this plugin
Will look like this:

In Settings you need to define default member type:

Enable Facebook or other login by plugin instructions:

And in elementor drag and drop it on wanted place like:

= What is difference between listings and membership subscribtions = Link
listing subscription is only for one specific listing, while membership is on user base, so can be for multiple listings. For example if you wish to buy better listing ranking, on top of results, you will buy listing subscription
with some rank, higher rank mean better position in search results and can be more expensive
But if you want allow clients to add specific number of listings for specific date period and similar options/restrictions, then you need membership subscription
= Troubles with SiteGround Hosting? =
Sometimes caching options causing troubles to some plugin like cooming soon/under construction/maintance plugins etc
1. Install SG Optimizer plugin
2. Disable all caching options inside plugin
screen:

= How are currency conversation calculated? =
Converted Value = (Default Value/Default currency Index)*Converted Index
Real example:

= What is difference betwen Agent and Owner? =
Owner will list their own listings
Agent will list listings from other people
On website difference is that agent can be available on some special places like Agents/Profiles page and similar
Admin can change it when edit listing, is Agent field, this field is actually used for both Agent/Owner and define who can manage/edit this listing
= You wish to use same header and footer on all pages? = Link
Why we didn't do that in our demo?
Because we wish to build everything possible with free elementor version
Blog pages for examples are not supported in free elementor version and also header/footer visual designing are not supported in free elementor version
Option 1 (Use standard wordpress header footer)
We also prepared Video Guide for this: https://youtu.be/Lne68xokbwk
Now, first option what you can do, use standard wordpress header and footer like on blog
this way you will not be able to visually design header and footer in elementor
Edit for example homepage in Dashboard and change template to "Elementor Full Width", example:

After that edit in elementor and remove header part which is build in elementor
This repeat on all pages
Option 2 ( use free elementor header & footer builder plugin or elementor pro)
For this purpose, you can install elementor header & footer builder plugin
https://wordpress.org/plugins/header-footer-elementor/
In Elementor copy one of existing header elements wanted and paste into header build with this plugin
This is example configuration for header template built with this plugin:

After that edit in elementor and remove header part which is build in elementor because now you have duplicated header on all pages (old one and this one build with this plugin)
This repeat on all pages
= CSS troubles in Elementor = Link
Most troubles in WordPress cooming from optimization and caching plugins so first try disable this plugins related or even all third parity plugins.
Also check if ssl/https is configured properly on your website.
Try latest stable version of Elementor, Beta versions like Elementor DEV editions etc are not stable and causing errors.
If you still have troubles with css in elementor, try this:

Also disable elementor experimental features/dev mode etc if you enabled, screenshot:

You can also try downgrade PHP version, sometimes if you using newest PHP version you can expect troubles with many plugins or even core wordpress, so for example currently in year 2022 you can try downgrade from 8.x to 7.4 or similar
We also experianced trouble in Elementor when using private pages in wordpress, so change into public, then try edit

= How to migrate or backup/restore website with our solution , move to another server = Link
Version 1 (Same domain, new hosting):
If you just changing hosting but will use same domain, then most simple way is just move all cpanel data. Hosting providers even usualy doing this migration completely for free, for example this one which we mostly using:
![]()
So you can just try ask hosting provider if can do that for you.
Even if you have new domain, this can be helpfully but you will need find replace method described in Version 3 below
Version 2 (New domain, new hosting):
Most simple way is with third parity plugins like https://wordpress.org/plugins/all-in-one-wp-migration/
Multisite should be disabled, because can cause troubles with missing data/tables!
Video example: https://wpdirectorykit.com/uploads/wp-migration.mp4
If you experianced trouble with filesize limit, this plugin is free until 512MB what is usualy enough for free websites.
BUT, your server have limitation most probably on 80 MB or similar by default, so configure it properly, hints:
You can check php.ini configuration, try use this values:
upload_max_filesize = 512M
post_max_size = 512M
Version 3 (New domain, new hosting):
Old fashion way is also manually, copy all files (zip it via file manager, download, upload to new server and extract there), move db usualy via phpmyadmin, and then using find replace url with new one if needed.
This can be done in database directly (Usualy via PHPMyAdmin) or via plugins like https://wordpress.org/plugins/real-time-auto-find-and-replace/
Many details about migrations can be also found on other third parity websites like:
https://www.searchenginejournal.com/how-to-migrate-wordpress-site/439024/
= Elementor Theme Builder issues = Link
Some clients experianced issues when building custom theme design for blog post in elementor pro theme builder.
Problem is usualy in conditions where you want to show such design, because most probably you want to show on posts, but not on listing pages, so this is important:

Also accessible here:

Also we made short video for this:
https://wpdirectorykit.com/uploads/elementor-posts-design.mp4
= Elementor z-index issues with one element (menu or similar) below another one = Link
In Web development / css this is well known as z-index issue. Elements with higher index are in front of elements with lower index.
Usualy z-index in changed for section, so you can change on 2 sections, section in thsi case with menu should have higher z-index then section below with map:


= WordPress.com troubles = Link
Regarding hosting providers, we using in our demos cpanel shared hosting (NOT WordPress managed) version from:
![]()
If you will need sftp access on wordpress.com:
https://wordpress.com/support/sftp
https://wordpress.com/hosting-config
For debugging:
https://wordpress.com/support/wp-debug
= How to change Listing Preview URL URI SLUG? = Link

Thats because you translated/changed or don't use sale/rent anymore:

so in elementor change here:

like this example:

field_5 means that field with ID 5 is used, if yo uchange that even this need to be changed.
= Page not found issues or similar? = Link
usualy this is because of permalink config, can be caused by someplugins or server changes, so try change permalink to "Post name"
So go to Admin->Settings->Permalinks
and here change to "Plain", save, then change to "Post name", save, this way wordpress will regenerate permalinks structure.

Sometimes if missing permissions, you will need copy this content into .htaccess file manually:

= Map default location? = Link

= Accidentaly removed listing page content or similar? = Link
possible situation is that you or some plugin/similar accidentally removed content from listing page, then most simple solution is to remove this page, even remove from trash (Admin->Pages) and then import again from Directory Kit Settings.
Short video with this example:
https://wpdirectorykit.com/uploads/listing-page-import.mp4
= Autooptimize conflict = Link
We detected that disable this helps in resolving some css related issues:

= Unusual issue detected and you can't solve problem, on layout? = Link
1. Before detecting we suggest to make backup just in case if something goes wrong, we described how to make backups above
2. Go thru our complete documentation, specially FAQ section, for example some common troubles like z-index configurations in elementor for cases when menu hidding ususual or part not visible etc. are described
3. Disable all third parity plugins and try to use some our theme or basic one like hello elementor
Specially caching plugins and optimizing plugins
4. Sometimes plugins are hidden inside wp-content/mu-plugins/ , so rename this folder to mu-plugins-temp
4. Clear all caches in your browser
5. Disable and clear all caching on server
6. Try regenerate Elementor CSS as described here
7. Try disable mod_security on server
8. Try with suggested PHP version, php.ini and configs like described here
9. Try replicate your issue on different server, for example here: https://demo.tastewp.com/nexproperty
If issue is still not resolved contact us with all details to email: https://www.wpdirectorykit.com/contact.html
In email please provide also: wp-admin login, cpanel login or someother login if needed to replicate issue, screenshot with issue, link with issue, steps to simulate issue so we can quickly check in detail and provide you most accurate answer
Support
If you have some trouble please first check complete documentation, specialy FAQ here
Feel free to contact us via support@wpdirectorykit.com, please provide your purchase code, screenshot, video, sketch, login credentials and everything what may help in solving your issue quickly.
If you have new ideas, we have roadmap ideas list and upvoting here for new ideas:
https://trello.com/b/xBiUhdEW/ideas
We will do our best to help you.
Hosting Suggestion
If you don't want to care about installation, updates, backups we can take care about that:
We can provide you fully managed solution with hosting, installation and all our addons license from 159$ yearly, you can order here: https://wpdirectorykit.com/order-website-now.html
If you want to all manage yourself:
We have many clients and tested almost all available popular and less popular hosting services.
Most troubles making GoDaddy, Wordpress.com, Sitegroud so stay away from this if you can.
On our demo servers and for testing we using a2 hosting packages.
Regarding hosting providers, we testing on:
![]()
Link to hosting: https://tinyurl.com/a2hosting-wdk
If you decide for any hosting important part is to NOT get WP managed hosting because those cooming with many limitations, preinstalled plugins which sometimes causing compatibility issues and you don't have control on your WP installation.
Get some standard Cpanel Shared Hosting Package and then you have full control on your WordPress Installation.
For example on a2 take one of this:

Also for performance is important, if you are from Europe, take server from Europe. A2 hosting also have server in Europe (Amsterdam) you just need to notice them on purchase.
Credits
Special thanks to:
- Wordpress
- TGM PA
- WordPress Boilerplate
- Elementor
- WP all import
- Stockspan for photos
- PXhere for photos
- jQuery
- Bootstrap
- Documenter
Thank you so much for purchasing this item!